Friday, 1 June 2012

Eco Greenhouse & Chicken Coop construction:


optimised_eco-greenhouse_coup_proces_montage_quick_rgproduct
With a few spare days in the blazing sunshine (May 22nd – 25th inclusive and May 29th & 30th 2012) I helped RBWM and St.Mary’s School Maidenhead to build their Eco Greenhouse and new Chicken run with coop. The following is a shot by shot of the processes we used and there is a lot of cross over between the two structures so I will illustrate both builds in tandem. For further information or to request amendments or corrections please email me. This blog entry is intended as a public resource for people to refer to and to inspire, please ensure all people are supervised and competent if using tools and any necessary permissions and insurance is in place if required. Seek professional advice if unsure of any process. Regarding images used they are taken by me and if there are any objections or sensible reasons for amendment please email me, this is an educational resource.


Eco Greenhouse outline and Manual/Instructions:

This consists of a timber frame structure that uses recycled and salvaged fizzy drink bottles with bamboo cane support to create the glazing instead of glass. It is a great way to have the entire school or organisation help create a viable useful greenhouse for teaching purposes. I am an experienced carpenter & designer (www.rgproduct.com) and having reviewed the original documents provided by RBWM (from an existing project) we amended the process to suit our needs (please note I do not claim ownership or authorship of these documents, if there are any rights issues please contact me). 

The Moray Council/REAP original instructions are very good and obviously have lots of useful info and should be read before commencement. I have combined it with some simple Chicken Run plans/elevations also supplied by RBWM and converted to PDF. If there are any download issues relating to the manual please email me.

REAP/CSV manual+Chicken_plans

Site/Prep:

In choosing site, consider exposure to sun, shade and wind throughout the year as well as any windfall from large trees (leaf/sap and bud toxicity for example). The above manual suggests concreting in your posts and this is a perfectly good option, however for various reasons I selected to create a slab base and bolt the main verticals down via foot mounts.  Chiefly for ease of repair and to prevent rotting of ground timbers etc. There was much discussion on this in relation to Chickens scratching for food etc but we felt having a solid base to clean back to, with a good layer of soil and grit would allow our birds to scratch yet keep the site cleanable and usable in diverse conditions.

For slab bases we did the following: Mark out your base extent with wooden pegs and remove turf to the compacted soil level, giving a good level base. Scrape and rake level to suit your personal tolerances.  (Michelle and Stewart doing a grand job via RBWM) - Eco Greenhouse base:

optimised_Windsor and Maidenhead-20120522-00246 
Chicken run base:

optimised_Windsor and Maidenhead-20120523-00253

The same method will be used for both the greenhouse and Chicken run.  Once the soil is ready, lay some water permeable plant stop membrane on the soil and sprinkle a good measure of sharp sand across this area and level.  The best way to do this is to set up some levelled timber guides and run a long strong timber across these to give a smooth sand finish. 

optimised_Windsor and Maidenhead-20120523-00269 
Do this once then stamp it down (we cheated/deviated a bit here and laid a slab set then used the wood beam process but either works).

optimised_Windsor and Maidenhead-20120523-00277

Add more sand and re-level Thanks Jo and Chris. Eco club parents:

optimised_Windsor and Maidenhead-20120523-00276
Start to lay slabs from a chosen edge or point, we used 600mm square slabs at 50mm thick. Mind those fingers and your back! Once your base is complete at some point you will add cement powder and water to it, brushed/broomed in and across the slab joins creating a cohesive base.  There is the option to add cement powder to your sand to make a really tough base. Depends on your time and budget issues, ground work can be as simple or comprehensive as you like and is not fully explored here. Google is your friend.

Greenhouse frame construction:

Having chosen to mount our posts on the slab surface and not into cement there is a fundamental structural issue to contend with; rigidity. As the posts are not held rigid, ready to rot in concrete we have to do this with the carpentry. It is assumed an experienced maker knows the basics to achieve the build as follows. Basic process list below, expanded thereafter:

1/
Bottle prep

2/
Create mitre cornered wooden frames to accept the bottle walls (Free ranging frames allow children to assist with bottle wall install and creation).

3/
Make main structure that is rigid and allows the wooden frames to be inserted later, once the bottles are attached.

4/
Bolt down main frame to site via post foot mounts (we literally lifted it from the build area to the install site)

5/
Install doors, internal shelving etc

6/
Install completed bottle walls and start growing and seeding stuff!

1/ Bottle prep

Allow for a month or two bottle collection and store them safely, once enough have been collected you will need to have your troops carefully cut the bottoms from the bottles (under supervision, an adult will need to pierce the plastic to allow children to use safety scissors and cut of the base of each bottle), clean, rinse and dry them for cane mounting. I think these are standard 2 litre bottles but choose your preference:

optimised_Windsor and Maidenhead-20120523-00255

Arrange your helpers and set up bottle cut, clean and dry stations and an area to cane them up.

optimised_Windsor and Maidenhead-20120523-00254 
As shown, everybody is involved!

optimised_Windsor and Maidenhead-20120523-00256 
Once you have your dry clean stock they can be mounted by sliding and wedging onto the support canes, the final one is reversed and wedged into the previous bottle. creating a neck at each end:

optimised_Windsor and Maidenhead-20120525-00294 
These are now ready to be placed into the mitre frames using U nails to affix the canes:

optimised_Windsor and Maidenhead-20120529-00356 
Tim Morton did a great job selecting and rejecting bottles that did or did not mate up well and produced great canes for install:

optimised_Windsor and Maidenhead-20120525-00298 
The final wall panels are impressive and neat, note the spare timber to keep them off the floor:

optimised_Windsor and Maidenhead-20120529-00355

2/ Mitred wall frames:

Decide your dimensions for the overall structure and allow for the corner posts, bottle dimensions and quantities, mitre frame sizes and sketch up a basic plan.  I suggest using a proper chop saw with RCD for 240v use or 110v site protection to accurately cut your 90 and 45 degree cuts. I chose 2m clear vertical height in the frames below and allowed for a multiple of 95mm width for each bottle cane and a rough vertical multiple based on a test bottle cane. An few cm’s here or there on the width across the frame is no issue. It is not an air tight thing.

optimised_Windsor and Maidenhead-20120522-00244
Mitre frames cut from tanalised (rot proof) 2 by 2 timber, mitre joined and screwed together with 80 or 100mm long pozidrive pro wood screws.  Do not buy cheap screws, the heads are rubbish and will not drive in. Suggest a decent drill driver to drive screws etc. Good value screw selection.

3/ Main structure

Timber used either 2 by 2 inch, 2 by 4 or 4 by 4 tanalised rot proof, 3 m lengths ideal generally.

To simplify things I used my bottle mitre frames to dimension my actual structure.  Literally clamping/screwing my vertical corner posts to them to give final dimensions (NOTE: use a thin spacer between your frames and the corner posts so they do not seize in there once you stiffen your corner posts, lolly sticks are perfect):

optimised_Windsor and Maidenhead-20120523-00261
From here you may add your roof structure, to any given height. NOTE: use long thin timbers to add triangulation to this frame to keep it accurate and stiff for moving if required. Below a very useful image shows the structure having been lifted into position by 4 strapping guys/gals. Notice triangulated timbers, these can be temporary until final fit is done or left in position. When finished it does NOT want to wobble, mine doesn’t.

optimised_Windsor and Maidenhead-20120524-00289 
This image show roof structure and build, NOTE, the roof is in situ with no removable frames in this instance. Roof Canes were nailed in situ.  Frames could be made to be mounted later if required:

optimised_Windsor and Maidenhead-20120529-00325

4/ Bolt down frame:

(further images to follow, an apparent glitch with my BB)

Regarding post foot mounts and overall height I chose to keep all timber 50mm off the floor and away from any rain splash/pools. This was achieved by simply having 50mm of slate layers carefully shaped and placed in each of the 4 foot mounts to lift the posts and therefore whole structure 50mm from the slab base, Jamie from RBWM “knapping” slate to suit:

optimised_Windsor and Maidenhead-20120525-00291

Layers of slate are simply built up to the required 50mm:

optimised_Windsor and Maidenhead-20120525-00293

With your happy helpers, lift each corner and drop each post into the foot mount and onto the 50mm of slate, this should leave 100mm of post inside the foot mount.  you will probably need to loosen the bottle frames a little to allow for this. Retighten frames before bolting down foot mount. Using a SDS drill to make the holes, bolt down your posts in situ; measure across the ends and sides to ensure they are the same (within a few mm) and check your diagonals too. Coerce the posts to suit before final bolt positions. I chose the very useful threaded bolts for concrete, image links to Screw fix:
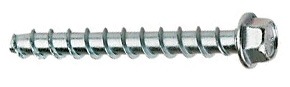
Multi-Monti-Flanged-Hex-Head-Shield-Anchors-6-x-50mmThese are simply bolted into the correct size hole created by your SDS drill and are very tough and reusable.

5/ Install doors, internal shelving etc

This is where the real carpentry starts, I reused the fence panels to create shelving and other elements across both projects, note the triangulation timbers still in place, some temporary and some in final position:

optimised_Windsor and Maidenhead-20120529-00324 
The potting shelves allow for ages 5 to 11 and are at heights approx 600mm and 900mm from floor (650mm and 400mm deep respectively). The top shelf is shallower to prevent the younger kids bumping their heads!

Door uses solid brass hinges with a wooden latch, part of a bottle cap used as latch bearing washer for ease of use:

optimised_Windsor and Maidenhead-20120529-00334

optimised_Windsor and Maidenhead-20120529-00341 
Shot shows internal structure and how bottle walls are fitted and relate to the scheme of things:

optimised_Windsor and Maidenhead-20120530-00377 
Finished shots to follow:

Chicken Run/Coop

As mentioned this ran in tandem with the above and the following is a selection of images showing the team at work (under my supervision). Chicken run basic frame with triangulation timbers in place to allow accurate construction, this was built in situ. 6m long 2 by 4 inch tanalised timbers ordered to strap full length of run, top frame corner mitred onto vertical corner posts I Eco Greenhouse frame in being built in background prior to lift move):

optimised_Windsor and Maidenhead-20120524-00282 
Wide shot showing start of elevated coop (12mm far eastern WPB weatherproof plywood) and also base edge, the sand layer now has a rough wood gravel board edge to gold in some dry cement/sand mix, this will harden over time and contain the sand and allow for roots/natural consolidation of the sand over next 12 months. It can crumble away after that having done its job:

optimised_Windsor and Maidenhead-20120524-00288 
The very game Michelle from RBWM doing her bit!…and yes the weather was stunning, Jamie acting as prop.

optimised_Windsor and Maidenhead-20120525-00307

The very helpful Jo learning to mesh staple, doing a terrific job too!

optimised_Windsor and Maidenhead-20120530-00374 
Detail shot of coop and slung ramp for Chicken access, ramp planks are the gravel boards from the base surround cement. The steps are to help the smaller children access the coop and are made mostly from recycled fencing and built to highest “Tonka” standard!:

optimised_Windsor and Maidenhead-20120530-00372 
optimised_Windsor and Maidenhead-20120530-00366 
Inside coop, a Hen shelf and perch stand:

optimised_Windsor and Maidenhead-20120529-00345 
A big thanks to our sponsors, RBWM, Mrs. Laycock, helpers and teachers. Not forgetting all the brilliant pupils. This blog will be updated with final shots and insert images as appropriate.

Richard Grant

Thursday, 17 May 2012

Awesome: Audio from jpegs.


I have often daydreamed about achieving this, now someone has and it is Awesome. Please spread the word.

http://www.musicinimages.com/

Tuesday, 15 May 2012

Fray Bentos: WW I. Horror & Humour on the Western front.


“A tin with meat in it…”

I have just been incredibly moved by this BBC4 Documentary and can’t recommend it highly enough: The First World War From Above

The footage and human elements shown are deeply affecting, the ponds remain in the contemporary landscape are calm yet speak of unimaginable horror. It is truly affecting.

I had to dig deeper into one particular aspect, The Tank stranded deep inside no mans land and how the incredible soldiers held of the German enemy for some time: Brilliantly nick named “Fray Bentos”

Clearly this small story would be perfect for a screenplay and story, I am looking for the book on this and have found various mentions of it (further reading below) and pushing for a feature production.

A very brief introduction here, the group of men were very highly decorated for their valour and efforts. The actual story is incredible and encapsulates the awful futility of the situation and the individual stories involved.

Outline:

F41 was a mark IV tank belonging to 'F' battalion Tank Corps. It was involved in the 3rd battle of Ypres, on 22/08/17 after crossing no-mans-land it got bogged, unfortunately the infantry hadn't kept up and the 9 man crew spent the next 72 hours fighting off determined German counter attacks including arty, trench mortars, MG's, infantry and assault engineers with demo charges.

"At 9.00pm on the evening of the 24th, the crew having manned their posts for 62hrs…and having been 72hrs in the tank decided to evacuate."

Report by commander of F41, Fray Bentos…The actual report is in the War Diary in the PRO. (WO/95/107 for teh Battalion)…Tank didn't survive. The name was re-used at Cambrai, and may have got onto a Whippet, but the last trace I've of it was on a Crusader I/II in North Africa!…F41 was Male 2329. 785, the Bovington Mk II was also in 18 Company at this time. (source)

THIS STORY NEEDS A FEATURE FILM MADE OF IT

http://1914-1918.invisionzone.com/forums/index.php?app=core&module=attach&section=attach&attach_rel_module=post&attach_id=129874

http://1914-1918.invisionzone.com/forums/index.php?app=core&module=attach&section=attach&attach_rel_module=post&attach_id=128810
(Above image source, a terrific resource posting of 2 pages – well worth a look)

Secondary note:

“…I don't know if you're aware of another contribution to Britain's war effort by Fray Bentos products.
I can't remember now where I read this, but the story, told by a British soldier, goes something like:
"Knowing that the Germans were short of food, we would begin firing tins of bully beef into their trenches with a catapult. We'd send over quite a few, then, when we calculated that a crowd would have gathered, we'd send over a couple of grenades. Then we'd hear the bugles blowing for stretcher bearers."
Not very sporting, I'm afraid. Especially when you consider that the company was founded by two Germans.”

Further reading:

“The Boiler Plate War” by John Foley
"Cameos of the Western Front - Salient Points Two" by Spagnoly and Smith
There's an account in Mitchells book "Tank Warfare".  There must be official accounts too in Battalion records at The National Archives.
'Band of Brigands'
A comprehensive forum posting comprising a photo survey related to maps. A production designers/Scriptwriters gift. I will get the ball rolling and start developing this as a screenplay/pitch. Such a strong dramatic story, full of life and death.

Saturday, 24 March 2012

Google Earth; I exist.


Some time back, whilst working as Design Director for Sarner I was sitting having a lunch time drink with a colleague when a Google Maps camera car went past…the result is below (Google Maps Link):

Gearth

Thursday, 8 March 2012

The Film Place; Buckingham UK: Digital Projector required.


image 
I am heavily involved with TFP (TheFilmPlace) as consult in audio and projection as well as branding for this worth while local project.  Cleverly using the Buckingham University auditorium and projector as a second use Cinema it saves local people the near 20 mile trip to Milton Keynes to catch a film. No mean feat when you have multiple kids, dark A roads or older citizens to consider.  Further we will also be improving the venue acoustics and light levels in this round of work. Lots happening!

Currently I am being asked to assist with a big upgrade from a 4m screen to 7m width 16:9 and this will include a new projector.  We are looking at nearly new BARCO or similar but these are very large, heavy and require serious install considerations. However I know there are very good Panasonic/Sanyo pro type machines much lighter and simpler than the BARCO/CHRISTIE type gear.

Does anyone have an ex hire, ex show or defunct venture Digi projector available please? Minimum 7 to 8000 lumens and a contrast ratio better than 2000:1 minimum. Further we will be using HDMI/DVI.  I am assuming any such device would not need special thermal extraction and has a reliable and easily swappable bulb/filter set up.  Lens would need to be replaceable, changeable or able to project 7m width at 18m throw.

ANY HELP APPRECIATED!

Please contact me here or email me: rgproduct@hotmail.com
My website FYI: www.rgproduct.com

Richard Grant

Wednesday, 7 December 2011

Wordle:


Very handy word cloud generator for any URL, pasted text/copy and RSS feed with the final cloud editable with many cool layout and design options!

WORDLE_rgproduct_word_cloud

Monday, 5 December 2011

Designed and Made in England


designed_and_made_in_England_rgproduct_deviantart_union_jack_quality_sculpture_stunning_speakers_www Support UK based creative's, designers and jobs (Lord knows the government does not seem to want to)!  Create UK jobs, buck the (downward) trend of this once great manufacturing nation.  And yes, I know China can make cheap stuff by the million but do we actually need lots more rubbish. No, we do not. Quality and heirloom or up-cycled products and items.  (Flag image courtesy of:) 

An example: www.rgproduct.com

Please re-use and re-link the “Designed and made in England” logo to this blog or my website home page to push this forward; as well using as on your site to promote your work.

Monday, 28 November 2011

Up-Cycled Screwfix catalogue: mix palette.

A really useful re-use of all those catalogues that end up being pulped...Simply use each page as a clean sheet for mixing your filler, paint or whatever. Tear off the used page when you need a fresh mix area, easy. Perfect!

Wednesday, 23 November 2011

Utility Bike Vernacular:

This simple and functional update to the freight carrying capacity of a push bike is both elegant and practical. An old wire shopping basket gets a second life. Up-cycled hardware saved from landfill if not re-cycled. Maidenhead Town centre.

Tuesday, 22 November 2011

Clear Skies…


“Clear skies for you my friend that you may see this night's end” - Astronomers shanty (anon).

Utility Bike Innovation Competition:

 
Gorgeous design detail meets high engineering standards as the most versatile transport form evolves:

Monday, 21 November 2011

Davis University deodorant; Amazon review:


When those pesky students start getting their own ideas and radically linking arms fairly quietly and frankly, stinking the joint out. Try the following product: A biting Amazon user review, with link after the image:

defense_technologies_pepper_spray_rgproduct_blog_oppression_fascism_newworldorder_disgrace_US

5 out of 5 stars Accept no substitutes when casually repressing students, November 21, 2011

This review is from: Defense Technology 56895 MK-9 Stream, 1.3% Red Band/1.3% Blue Band Pepper Spray (Misc.)

Whenever I need to breezily inflict discipline on unruly citizens, I know I can trust Defense Technology 56895 MK-9 Stream, 1.3% Red Band/1.3% Blue Band Pepper Spray to get the job done! The power of reason is no match for Defense Technology's superior repression power. When I reach for my can of Defense Technology 56895 MK-9 Stream, 1.3% Red Band/1.3% Blue Band Pepper Spray, I know that even the mighty First Amendment doesn't stand a chance against its many scovil units of civil rights suppression.
When I feel threatened by students, no matter how unarmed, peaceful and seated they may be, I know that Defense Technology 56895 MK-9 Stream, 1.3% Red Band/1.3% Blue Band Pepper Spray has got my back as I casually spray away at point blank range.
It really is the Cadillac of citizen repression technology.
Buy a whole case!

Wednesday, 16 November 2011

Sound Suits:

With an alluring title this blog story combines costume, sculpture, (e)motion interaction and recycled found materials.  These figures literally rustle, clatter and joculate through space carried by their bearer:

image

Standing Desk:

Intrigued by various Tweets on tall and standing desks I thought my recent sculpture workstation fitted the bill rather well. Fully height adjustable and rotates for 360 degree work access (note the up-cycled screw adjust stool and tripod base made from scraps). The accompanying side table for tools and materials is simply a wood board scrap screwed on a quick release foot on a Camera tripod, simple and very effective. The sculpt is of my latest loudspeaker, a reworking of my classic African Mask Speaker:

standing_desk_rgproduct_allthingsblog_design_sculpture_speaker_african_mask

Tuesday, 15 November 2011

Tact:

In Baisers volés, Delphine Seyrig explains to her young lover the difference between politeness and tact: ‘Imagine you inadvertently enter a bathroom where a woman is standing naked under the shower. Politeness requires that you quickly close the door and say, “Pardon, Madame!”, whereas tact would be to quickly close the door and say: “Pardon, Monsieur!”’ It is only in the second case, by pretending not to have seen enough even to make out the sex of the person under the shower, that one displays true tact.

Mountbatten Pink

Mountbatten Pink_Plymouth Pink_SAS_war_camouflage_ rgproduct_blog_Pink Panther_Land Rover_desert_warfare_terrorism

Monday, 3 October 2011

Das Unheimliche

Any Psychological concept with a core concept named the “uncanny valley” deserves a link in my opinion, Great stuff:

WIKIpedia_Mori_rgproduct_dot_com_allthingsblog_Uncanny_Valley_Masahiro_Unheimliche

Monday, 25 July 2011

"The average man, who does not know what to do with his life, wants another one that will last forever". ANATOLE FRANCE (1844-1924)

Perhaps the trick is to make this life last for ever in its impact, ideally for the best?

Tuesday, 14 June 2011

Temporal Pixel Multiplexing:

This is something even cooler than its outrageous name suggests. All I can do is link to the explanation and wait for the sound of jaws on the floor.

I love it and can't wait to try it or use it some day. Happy Temporal Pixel Multiplexing!

Tuesday, 31 May 2011

Alice in Wonderland/Disney – Berlin - Gala Magazine Fashion Shoot.

I found this great little making of video for an AIW themed Fashion shoot shot on the Alice Touring Exhibition I took round the Disney territories, here shown in Berlin below the Potsdamer Platz. It goes back a year or two but gives a good feel for the show and its marketing potential:

“Exclusive behind-the-scenes footage of Gala Magazine's Alice-inspired fashion shoot, against the backdrop of Disney's Alice in Wonderland Touring Exhibition”.

Thursday, 19 May 2011

Duke Nukem Viral Autopsy Video:


I sculpted and created the Alien baddie "PigCop" Head for this Nukem promo shot in a London Morgue; we used a leather hide for the grey skin and it worked great. A local murder victim was brought in on the day. "We don't have many murders at the weekend, haven't for ages..." RIP.

Wednesday, 18 May 2011

African Ancestor Head speakers on display in LA:

A quick snap from the DIALECT Gallery in down town LA. My speakers are on display here and one can be seen by the cash desk.

Sunday, 27 February 2011

Ceiling baffles, Paris. Neon+small scale.

Another set of white geometric ceiling forms, this time off Boulevard St. Germain, Paris. The light tubes are proper white neon and the ceiling a very small bar/service area. Good double espresso here too. Retro, sci-fi and cool. Wonderful.